When we first bought our Recreational Vehicle, we were very excited, just like little kids who get their first toy! Little did we know that along with fun, there is a bunch of maintenance. The question that bothered us the most was – how to remove dicor lap sealant?
I know you will be saying just google it! But unfortunately, there was no google during our times or a blog like this that you could read. After a lot of trying and testing, we finally have a step-by-step guide that you could use to remove dicor lap sealant safely.
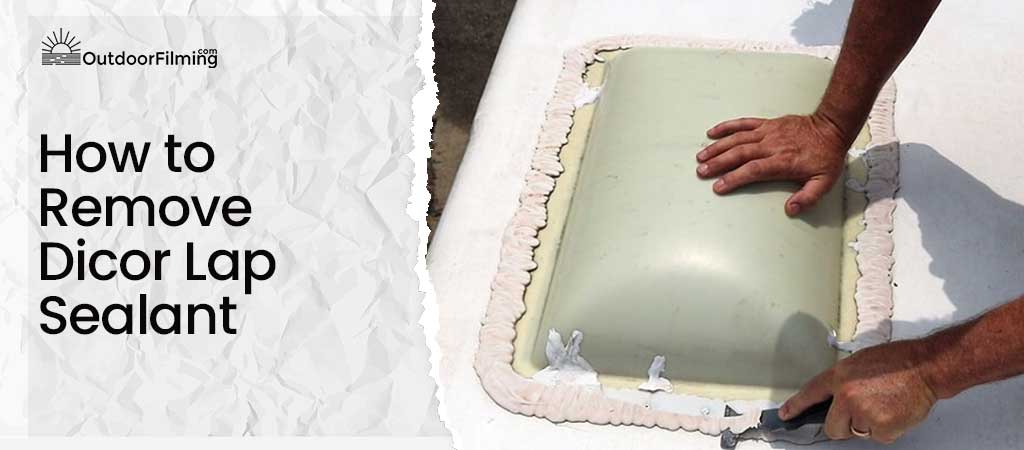
How to Remove Dicor Lap Sealant?
The tools used to remove the dicor lap sealant depend upon the type of roof. However, there are few common steps that can be used to remove the dicor lap sealant from any type of roof.
Material required:
Before diving into the process, it is important that we have all the necessary materials.
- Old rag cloth
- Acetone or any type of cleaner
- Hairdryer or hot air gun
- Scraping tool
- Gloves
Process:
Step 1: Prepping
Gloves – although they are optional, I will suggest that you put on your gloves before you start since they protect you from any mess or skin injury while scraping and also because a pair of nice rubber gloves hurt nobody!
Next, put some acetone or any cleaning liquid on the old rag cloth and clean the area thoroughly. Acetone dries out pretty quickly, yet we suggest you check if the area is completely dry before going on to the next step.
We did once try using the sealant without cleaning the area just because we were a bit lazy, let me tell you, the result was bad! You are warned!
Step 2: Heating the dicor lap sealant
While removing the sealant, it is important that it is soft, especially a roof sealant as it helps remove the sealant with fewer scratches on the surface.
Use a hairdryer or hot air gun, the air used should be hot to soften the dicor lap sealant but not too hot that the sealant would end up melting. Keep the heat setting on low.
Work in batches, heat a little area and then move to step 3.
Step 3: Scrape it off!
Once the dicor lap sealant is hot and soft, use a scraping tool that suits the surface on which the lap sealant is used for sealing.
Start inserting the scraping tool from the sides and slowly work inwards. The scraping tool will start lifting the sealant up. Remove a patch and then repeat step 2.
Keeping repeating step 2 and step 3 till the entire dicor lap sealant is off.
Step 4: Final Cleaning
Once you have removed the entire sealant, it may leave some residue. Use acetone on the old rag cloth again to finish the process.
What Is Dicor Lap Sealant?
Now that we know how to remove Dicor lap sealant, I want you to know what dicor lap sealant is before sharing the tips and tricks. As the name suggests, Dicor lap sealant is a secondary or a mechanical seal that is put over the edges of the roof, pipes for ventilation, etc. It is used especially on the rooftops of RVs on the joints to seal any gaps that might exist during fittings to prevent leakage, entry of insects and to give extra supports. It can also help prevent the entry of dust, sound, and heat.
It is compatible with different types of membranes such as ethylene propylene diene monomer (EPDM) membrane, Polyvinyl Chloride (PVC) membrane along with aluminum and fiber. Sometimes eternabond rv tape can also be used for the same but we prefer an actual sealant over such tapes.
How to Remove Dicor Lap Sealant: Tips And Tricks
It is necessary to take all the precautions or else you might end up making a hole in the roof of your RV and later complain we didn’t mention, so read the next few tips carefully.
- Be careful while using the hairdryer or hot air gun. Don’t overdo it.
- Use the correct scraping tool depending upon the type of surface. If the scraping tool is not correct, you will end up scratching the surface. Be especially careful while working with rubber surfaces.
- Some people prefer making incisions to the dicor lap sealant, however, we do not prefer making incisions since they create more mess.
- Use a container to store all the waste.
- The dicor lap sealant cure time is up to a month, which means it takes around a month for the dicor lap sealant to harden. The dicor lap sealant must cure well to get the best protection.
- How to remove the Dicor Lap Sealant?- Choose a nice sunny day. As you might have read above that heat aids the process, a sunny day will help for sure.
- Lastly, RV roofs are pretty high up. Be cautioned while working especially when you are at the edges as a fall from the roof may cause a serious injury or even be fatal.
When to Change the Dicor Lap Sealant?
There have been times when we thought we had to change the lap sealant, but there was no need to do so. Hence, it is very important to understand when we need to change the sealant.
- Cracks, holes, or bubbles
Check the existing sealant. If there are any cracks, bubbles, or holes the sealant needs to be changed. In case there is a single tiny hairline crack then you may apply a coat of the Dicor lap sealant instead of changing it entirely. It is very important to check the area of sealant in contact with the surface, if it has loosened up, change the sealant.
- Press the sealant with your finger!
It is important to know if the Dicor lap sealant is in good or bad condition before changing it. You can give a glance and check if there are any cracks but to check if the Dicor lap sealant is still good, press the sealant with your finger. If it gets pressed easily and creates a small indent that later gains its shape again, then the sealant is still perfect.
- Check the lap sealants every six months.
Although sealants last well for years, it is wise to check the sealant every six months properly. Any issue such as exposure to high heat may damage the sealant – better be safe than sorry!
You may also like: Best RV Battery for Boondocking
- It is wise to change the sealant every two years.
Dicor lap sealants last for years, we have seen some RV owners who do not change the sealant for five years, we did that once too but after having to deal with its consequences we decided to change the lap sealant every two years. Haven’t faced any issue with leaky roofs since then.
- Heat exposure
As discussed in step 2, heat helps to loosen the sealant. While it is beneficial when we wish to remove the lap sealant. It is not the best thing when the RV is in use. Hence, it is important to check the lap sealant when it is exposed to high heat to check if there is any breakage or loosening of the lap sealant.
Why Dicor Lap Sealant?
Over the years, we have tried and tested various lap sealants and our most favorite is the Dicor Lap Sealant. Both the self-leveling and the non-self-leveling sealants work very well and have given us no issues at all.
When the surface of the RV is cleaned well, it sticks properly. It can be used alone without having to spend money on any other product. Just ensure that you remove the previous coat of sealant correctly before applying a new one.
FAQ’s:
What are the types of dicor sealant?
There are three types of dicor lap sealant:
- Non-Leveling Lap Sealants.
- Self-Leveling Sealant for OEMs.
- Non-Leveling Ultra Sealant.
Which type of sealant should we use?
The type of sealant depends on your needs. Both the self-leveling and non-leveling lap sealants work well.
How long does it take for dicor lap sealant to cure?
The dicor lap sealant cure time is one month.
Are there any dicor lap sealant instructions?
Yes, dicor lap sealants do come with instructions. You can read the instructions on their website.
Can you paint Dicor lap sealant?
It is absolutely okay to paint over Dicor lap sealant however, it is important that the sealant is completely dry.
Final Thoughts
The answer to ‘How to remove Dicor lap sealant’ is pretty straightforward. Heat the sealant just enough to make it soft and then remove it. However, to ensure that we cause no damage to our RV or any surface we have used the sealant on, it is important to follow all the steps mentioned in this blog.
There are various scraping tools used for various surfaces, choose the scraping tool correctly. Be mindful while removing the sealant so that you don’t end up making abstract art of scratches of your beloved RV!